Greetings, medievalists!
The new major update, titled “Diplomacy Update” (1.2.10) is now live on Steam, Epic Games Store, and GOG! It’s compatible with previous saves and all the fixes and improvements from the experimental branch are now stable, tested, and present in this update! These include: Diplomacy system, Hirelings & Mercenaries, Region Market changes, Inflation and more!
To celebrate this event, we’ve bundled with some great games. Check them out:
https://store.steampowered.com/bundle/89432/Going_Medieval_X_Primitive_Society_Simulator/
https://store.steampowered.com/bundle/90125/Foundation_x_Going_Medieval/
For the full list of all available bundles, visit this link:
https://store.steampowered.com/bundlelist/1029780/Going_Medieval
But let’s get back to the subject of this topic – here is a video where one of our devs plays and explains all the new things:
For a more detailed report, read below.
Diplomacy
There are 12 NPC factions in Going Medieval that belong to six different faction types. Those are:
Faithful
Church of the Third Coming
Ancrene Disciples
Pagan
Circle of Avalon
Beirdd Cymraeg
Knowledge
Philosophers of the Natural Order
Society of Fellows
Monarchy
Faithful Sons of England
Band of the She-Wolf
Anarchy
Kingdom of York
Heresy of the Rose
These are factions that you can interact with. You can be friendly with them, attack them or some state similar to those in-between. Nothing is set in stone and with certain actions, over time, you can change alignment to the other side.
However, there are factions that won’t budge. The ones who are too bloodthirsty and aggressive to ever try to befriend. Those are:
Cannibal
Progeny of the Plague
Ravagers
On top of that, all these factions have pre-established relationships and your alignment with some may influence reactions with others.
But one way to get the most out of these relationships is via the new Diplomacy system.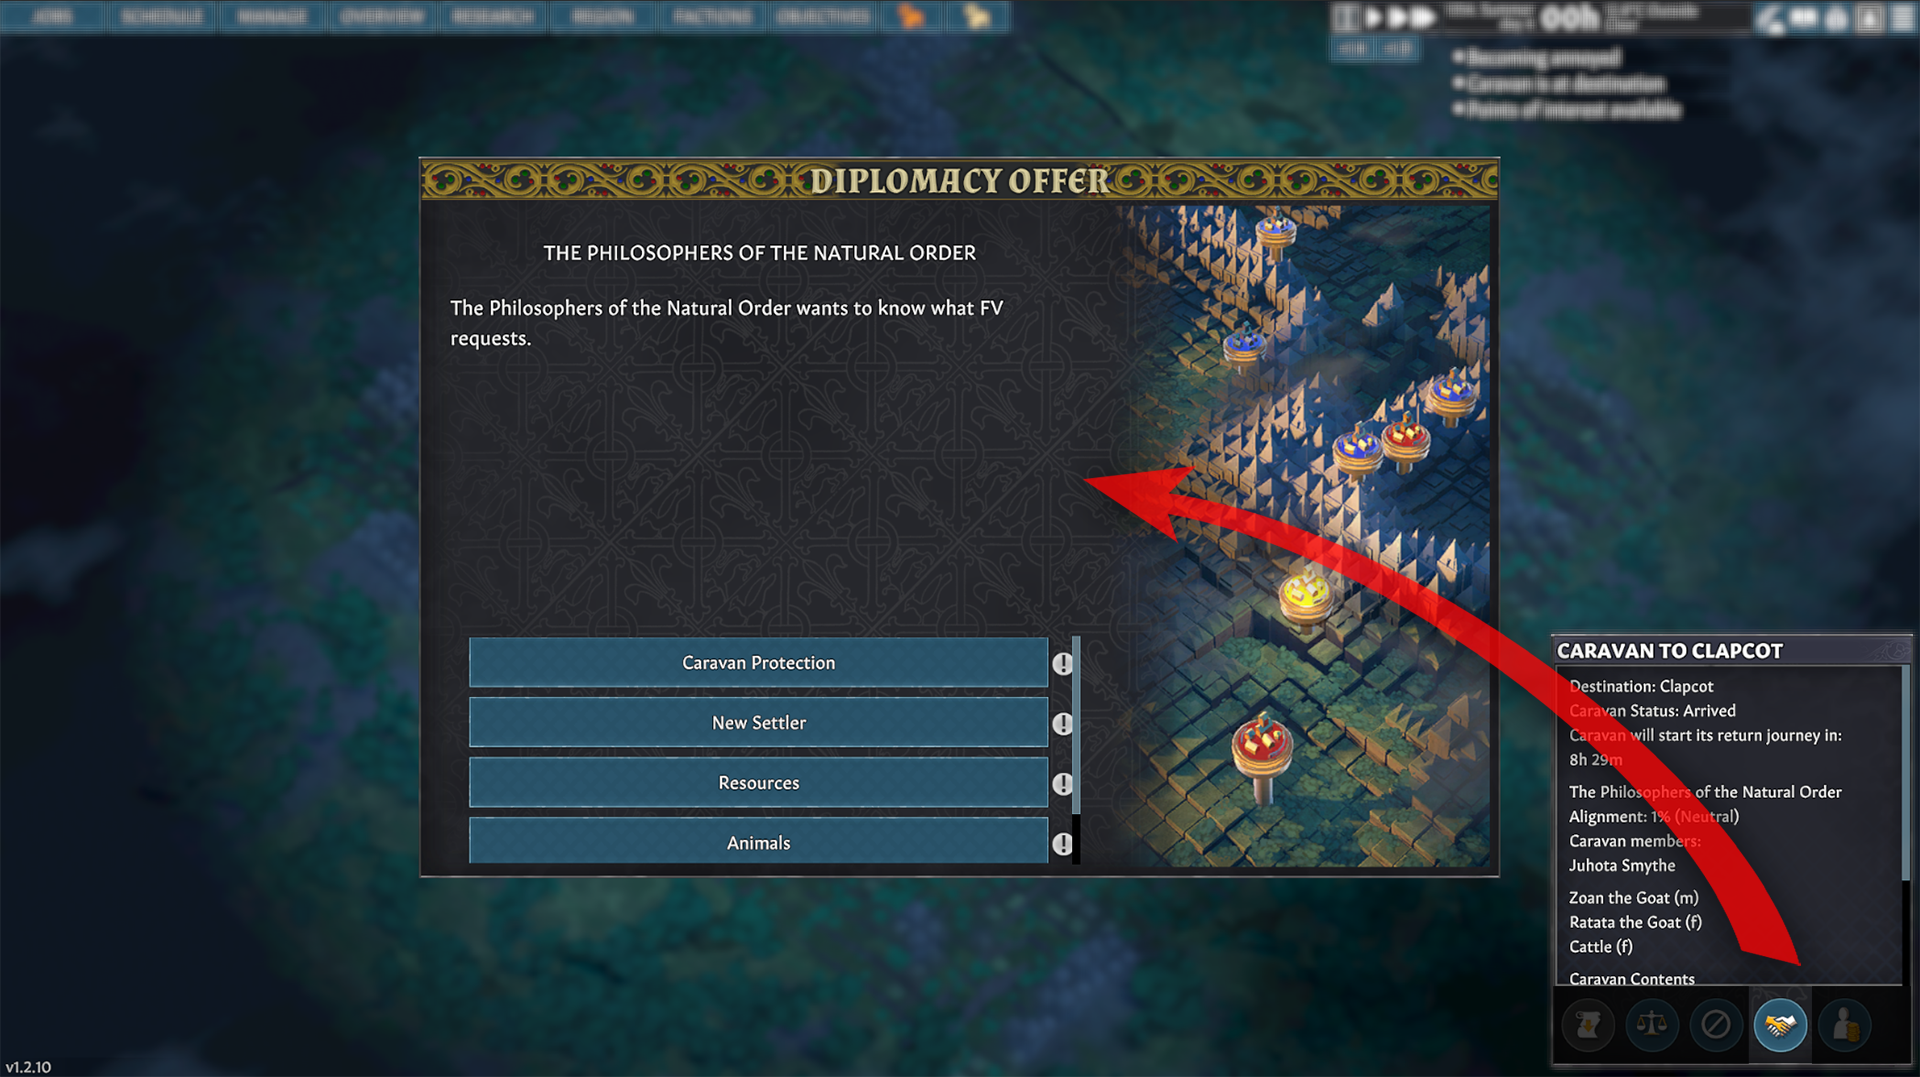
Send the caravan to the NPC settlement and upon reaching the settlement, you will get a Diplomacy option. Selecting it will present you with several favors you can ask them, depending on your friendliness with the faction, current state of your settlement, caravan content, and other factors:
- Caravan protection – They will protect any caravan that is traveling to and from the faction settlements and any point of interest that is near those settlements.
- New Settler – They will send one of their own to join your settlement permanently.
- Suppress Bandit Camp – For one year, you can use this favor to clear one bandit camp instead of deploying your own warriors, then send a caravan to loot it later.
- Resources – You’ll get a choice of goods you wish to acquire.
- Aid in Defense – When the next raid comes, they will send warriors to fight beside you. The offer stands until it is used or the agreement expires.
- Aid in Attack – Their warriors will join your next attack on an enemy settlement or bandit camp, fighting at your side at no cost.
- Animals – You’ll get a choice of animals you wish to acquire.
- Rare Object – They will track down the rare item your current grand objective calls for and deliver it.
But, of course, you will have to do something in return. Their demands can include:
- Deliver Goods – The faction demands a delivery of a specific resource. Send goods to one of their settlements or specific locations.
- Hand Over a Prisoner – Give them a prisoner you are holding. Choose which prisoner to part with when you settle the deal.
- Clear Bandit Camp – Send a caravan to destroy the marked bandit camp.
- Lend a Settler – Lend them one of the settlers in the caravan.
- Ambush Enemy Faction – The faction demands that you ambush an enemy caravan. Ambush the marked location on your regional map. This could be a faction that you are on good terms with, so watch out.
- Brothers in Arms – The faction asks that you help them in a skirmish. Enter the marked location on your regional map and help their warriors defeat their enemies.
- Deliver Livestock – The faction demands a delivery of livestock of a certain value. Drive the animals to one of their settlements.
Keep in mind that you can make one active diplomatic deal. Once that one is completed/abandoned, you can move onto the next one.
You can try diplomacy with the hostile factions, too. However, in that case, you only ask for a Peace Deal and break the hostility. That will usually mean giving them a certain amount of resources or livestock. Is it worth it? That is up to you.
Envoy
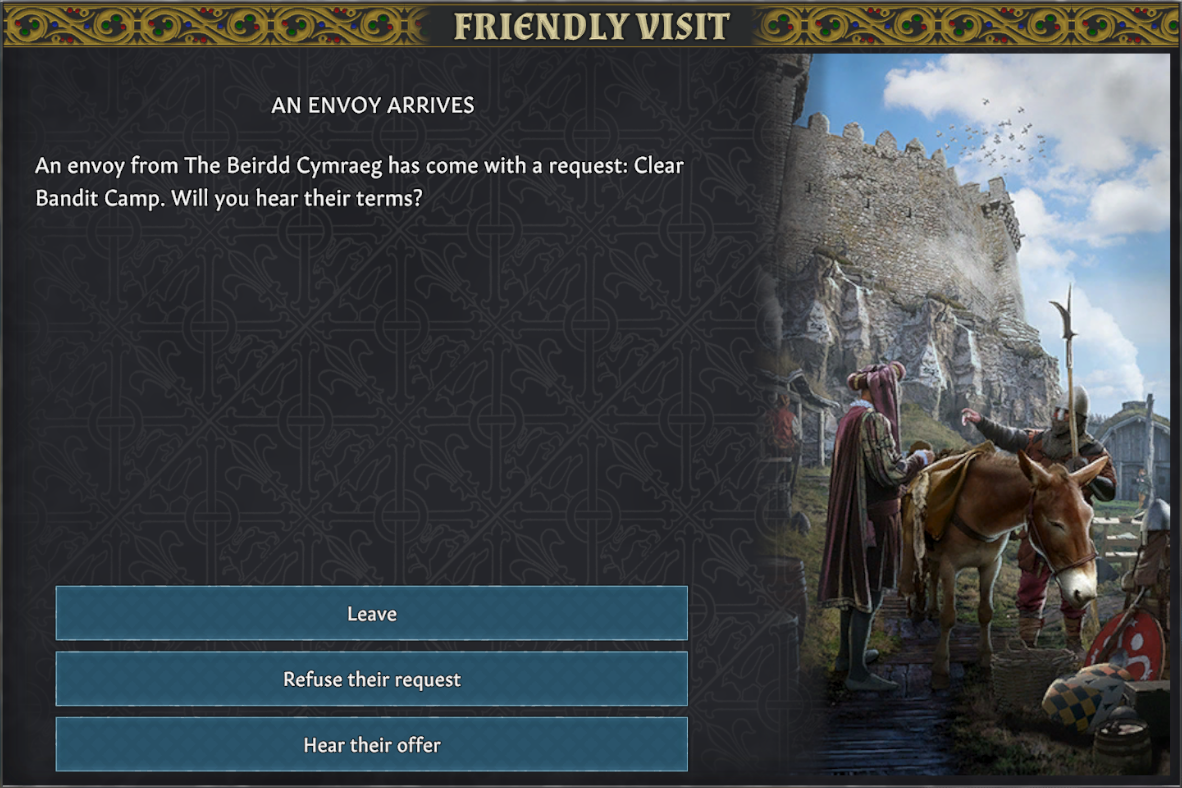
Non-hostile factions may send an envoy to your settlement. An envoy represents the faction coming to you with a specific request already in hand – you can’t choose what is asked of you, but you do choose what they receive in return.
Only factions with friendliness ≥ -60 (Neutral or Friendly) may send envoys and factions will not send an envoy if there is already an active deal with them.
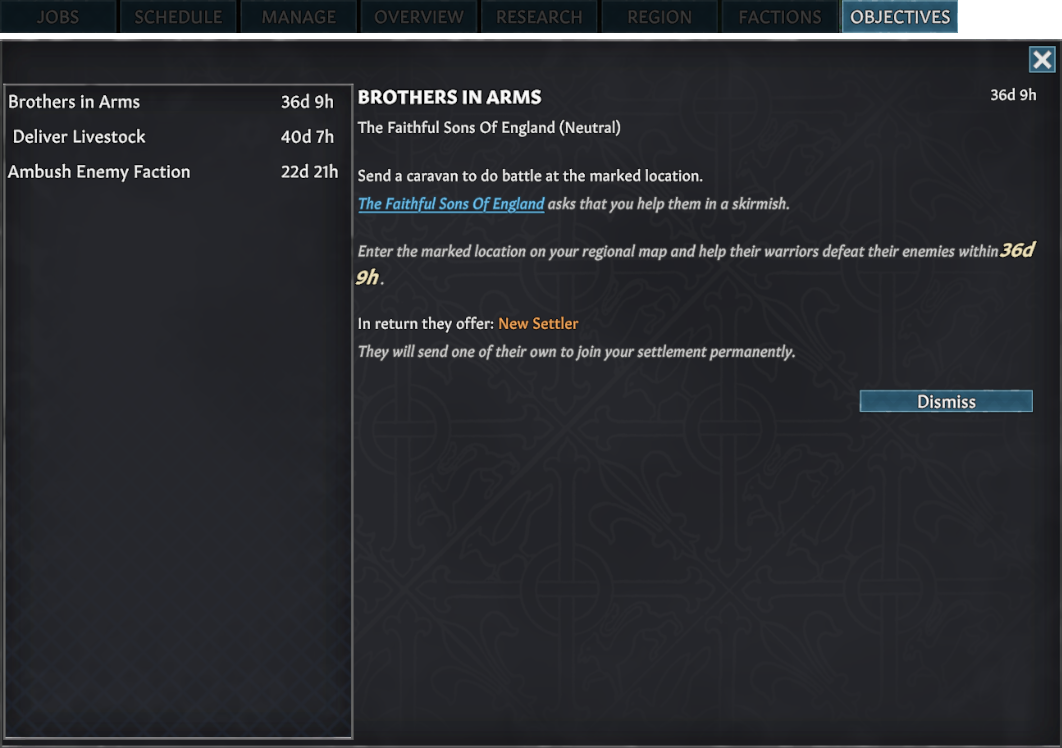
Once the favor/demand has been made, a message will appear. You can check it and track it in the OBJECTIVES tab in the upper part of the screen. For each objective you will get info who requested it, what they offer in return and how much time you have to complete them.
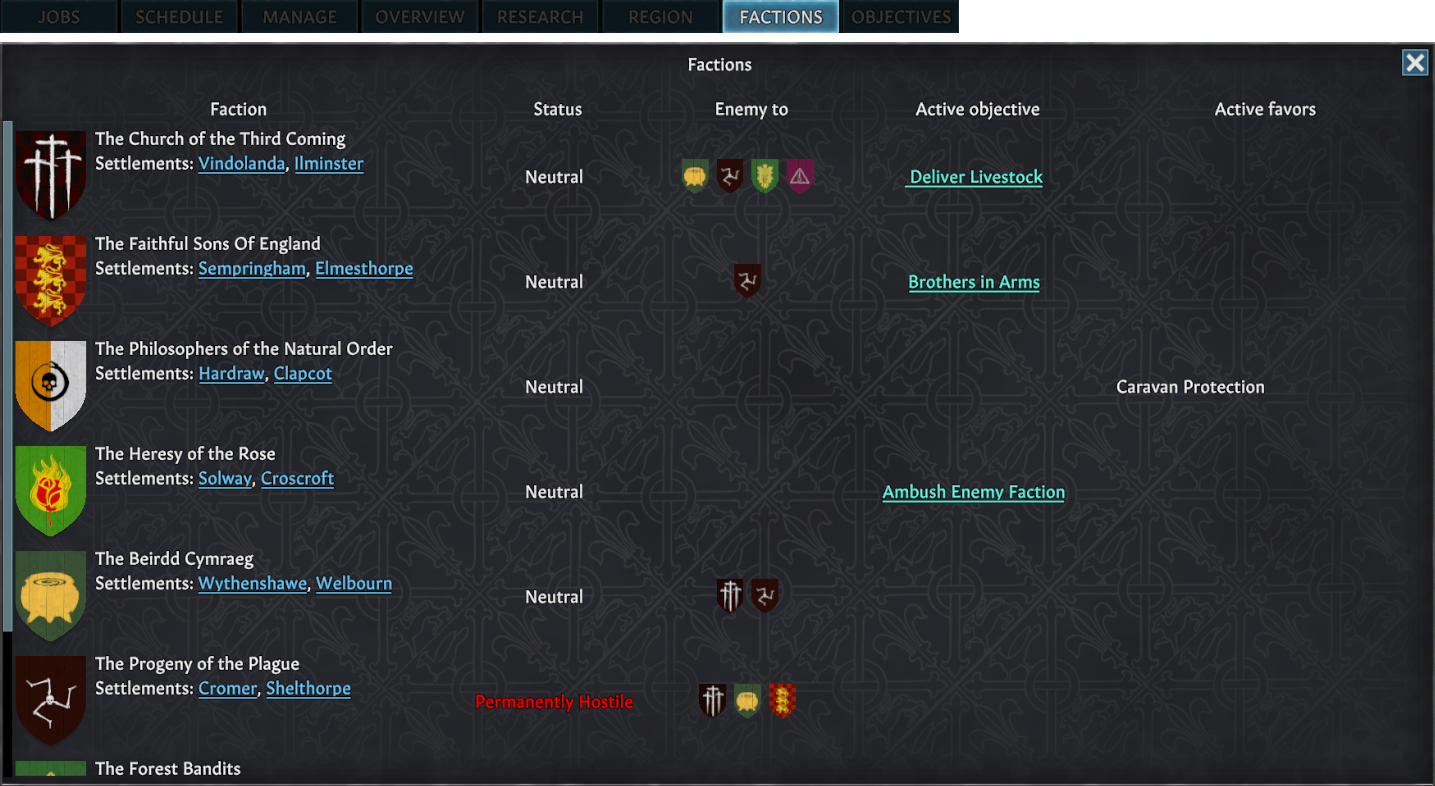
In addition to that, FACTIONS is now a tab, too (moved from Historical Records) and now offers a better view on current faction relationships, the favors you are performing for them and the demands you are asking of them. Much easier to track this way.
You can fail the objectives if the time runs out or if you decide to cancel an objective and, in doing so, fail it. The faction always delivers their side. No pressure!
Hirelings & Mercenaries
As you may have noticed in the Diplomacy section, you can assist other factions or receive assistance from them through favors and demands. But you can also hire people.
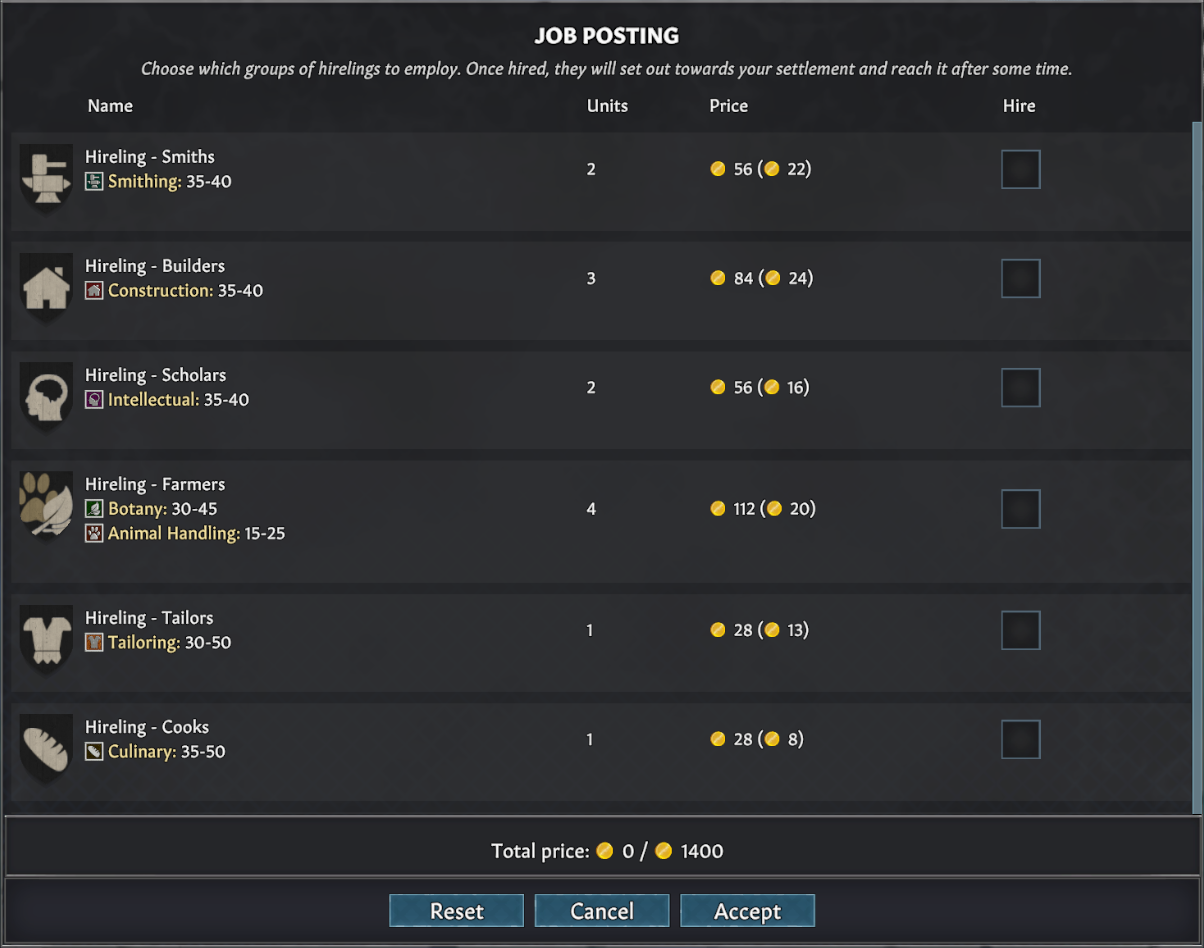
Once your caravan reaches a settlement, you can check its Job Postings. This will show all available hirelings you can bring to your settlement, such as miners, scholars, smiths, and others. The better your relationship with that faction, the more options you will have. Here is what you need to know:
- Each posting will show the approximate skill level of the hirelings, how many of them are available, and their price.
- The price includes travel expenses and their daily wage.
- Hirelings are paid every day at 9 AM.
- Once hired, it will take them some time to reach your settlement.
- Worker hirelings cannot be drafted. They will only perform the jobs they were hired for.
- You can adjust their schedule and manage their inventory.
- They can take part in social interactions, but they will never take things to extremes, such as starting a fight.
- They need food to eat, a place to sleep, and ways to satisfy their leisure needs.
- They cannot become rebellious, but they will leave your settlement if their mood reaches 0.
From time to time, these types of hirelings may also appear in your settlement on their own. However, their number, price, and stay duration may vary.
If you are more interested in fighting, Job Postings in settlements may also offer several mercenary groups. Their type, price, and number will vary based on your wealth and the location of the settlement you are visiting.
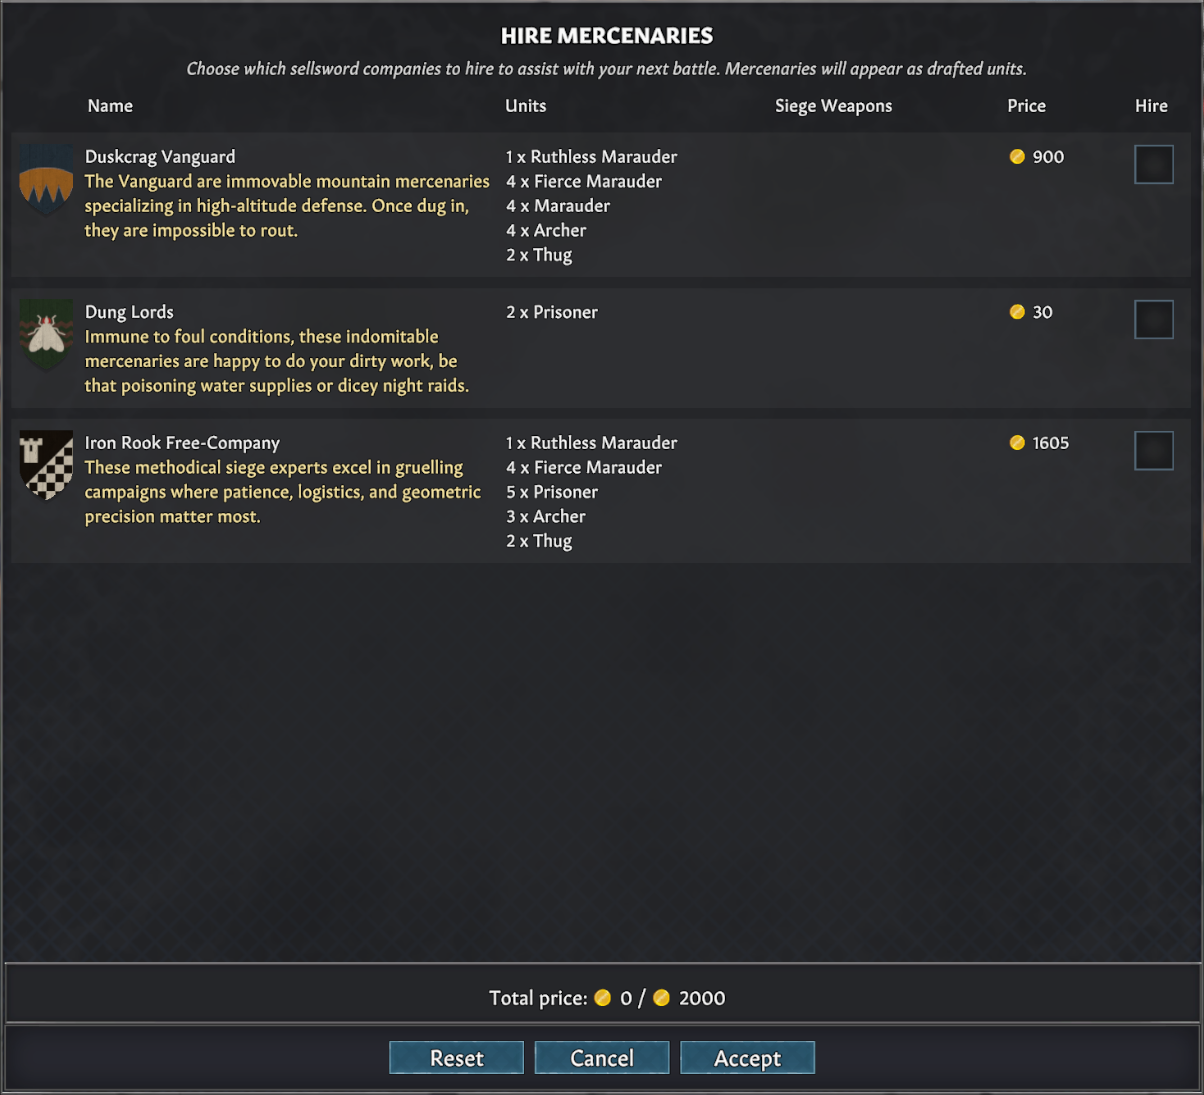
These are non-partisan folks who follow the coin first. Here is a short pitch for each group:
- Duskcrag Vanguard – The Vanguard are immovable mountain mercenaries specializing in high-altitude defense. Once dug in, they are impossible to rout.
- Burgundy Dawn – Flamboyant and deeply motivated by coin, these mercenaries fight in tight phalanxes. They guard merchant caravans and break through enemy lines on the battlefield.
- Gilded Marksmen – Renowned for raining absolute devastation from afar, their black and white stripes strike immediate fear into opposing armies.
- Dung Lords – Immune to foul conditions, these indomitable mercenaries are happy to do your dirty work, be that poisoning water supplies or dicey night raids.
- Order of the Cross – Led by a former monk, this fanatical pseudo-religious order offers a terrifying mix of holy zeal and cold-blooded professionalism.
- Iron Rook Free-Company – These methodical siege experts excel in grueling campaigns where patience, logistics, and geometric precision matter most.
- Concord – This elite group of disciplined eastern knights possesses an ironclad bond. They are famous for absolute loyalty and never breaking a contract.
- Maw of the Steppe – As silent as they are brutal, these mercenaries eschew heavy armor in favor of speed. Known for their terror tactics, armies pay them off just to avoid being raided.
This is mostly flavor text for now, but we plan to add some personalization to these groups through their equipment.
If you hire these groups from neutral or friendly settlements, they will come to your settlement after some time. Once they arrive, you can:
- Draft them and use them in combat.
- Use them for hunting, fishing, and hauling.
- Send them with caravans and use them when fighting bandit camps or attacking enemy bases.
The other way to hire these groups is by visiting hostile or enemy territories. When you choose to enter the map, a Hire Mercenaries window may appear. Hiring them there will deploy them directly to the area you are attacking. Keep in mind that if you leave the map, they will leave too and will not return with you.
Overall, the main difference between hirelings and regular settlers is that hirelings:
- will leave the settlement if their mood drops too low
- are hired for a limited time, such as a week, a year, or a single battle
- have certain jobs disabled, meaning fighters cannot do regular labor around the settlement
- cannot always be drafted, depending on their type
- cannot hold a role in the settlement
The good thing about Job Postings is that you do not have to send caravans just to see your hiring options. Selecting settlements on the regional map will show available hirelings, mercenary groups, and their prices.
This should give you more ways to use gold, prepare for larger projects, strengthen dangerous expeditions, or simply get a bit of extra help when your settlers are stretched thin.
Region Market Changes
When it comes to trading, the old system allowed you to repeatedly sell large quantities of the same easily produced resource. This was… functional and fine, but also a bit boring and easy to exploit.
These new changes should encourage you to diversify what you produce, trade with different settlements, and pay more attention to faction preferences. Normal or occasional trading should remain largely unaffected.
Inflation
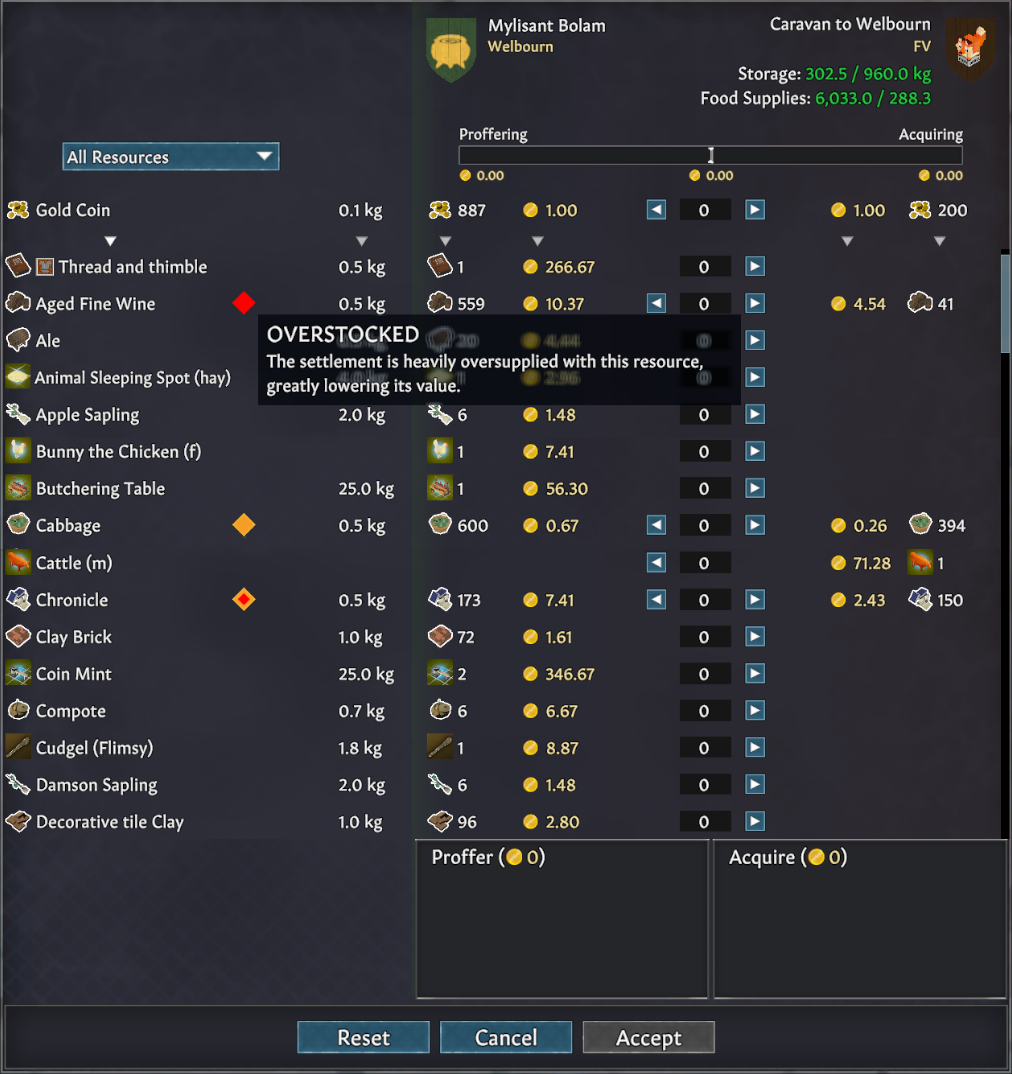
We are introducing a lightweight supply-and-demand system. This system should:
- Discourage repeatedly selling huge quantities of the same resource to the same settlement.
- Encourage trade diversification and make choosing where to sell goods more important.
- Work with existing seasonal, biome, faction, and trader price modifiers.
Most importantly, it should be understandable without requiring you to actively manage an economy. Normal, moderate trading should have little to no noticeable effect on prices.
Here is an example of how it works in practice:
You sell Honey to NPC Settlement A. The first moderate shipment is sold at the normal price. Depending on the amount of Honey sold, you may receive a message that Honey in that settlement is entering a Low Saturation state.
If you sell more Honey to NPC Settlement A shortly afterwards, it will receive a stronger price penalty. You can still sell Honey to them, but at a lower price.
If you continue selling Honey to that same settlement, depending on the amount, it may enter a Saturated or even Overstocked state, each with its own price penalty.
Another settlement maintains its own market state, so you can take Honey elsewhere or wait for demand in NPC Settlement A to recover. Depending on the saturation level, recovery may take anywhere from a couple of days to several days.
Visiting merchants use the market state of their settlement of origin. Selling Honey to a merchant from NPC Settlement A will therefore affect future merchants from NPC Settlement A, as well as direct trade with that settlement.
Faction-Specific Resources
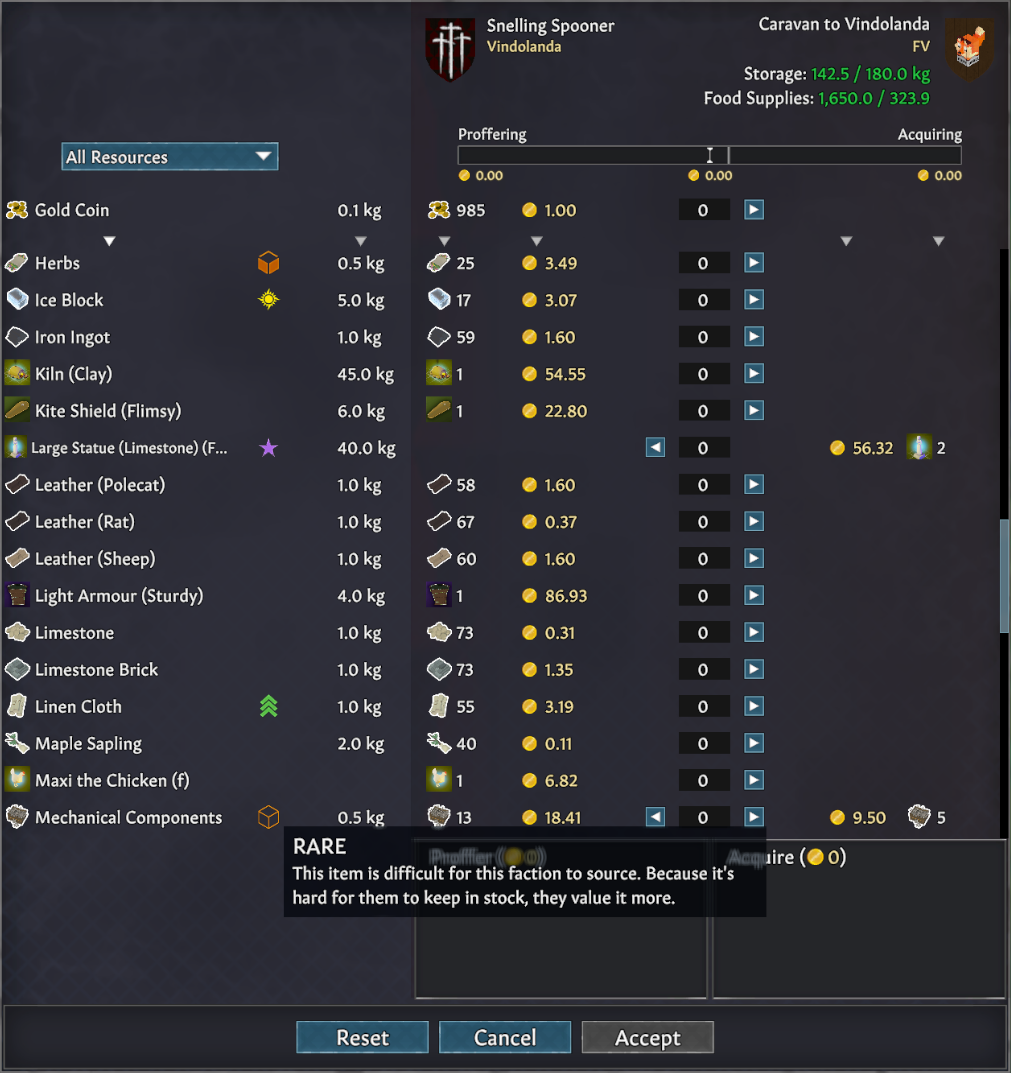
We want to give each Faction Type a recognizable economic identity and make faction lore matter more during trade. This will be indicated by symbols on some resources during the bartering process. Hover over a symbol to see what it represents:
- Premium – Traders from this faction value this resource and are prepared to pay a premium to secure it. They will also ask a higher price when trading this item to you.
- Depreciated – Traders from this faction place a low value on this resource. They will only trade it at a low price.
- Oversupplied – Members of this faction have ample stocks of this item. This lowers the price somewhat.
- Rare – This item is difficult for this faction to source. Because it’s hard for them to keep in stock, they value it more.
- Exclusive – This item is exclusively offered by this faction. No other faction sells it.
In addition to that, we’ve also introduced symbols for resource scarcity/abundance when affected by a current season.
Hovering on a value of a resource now shows you a list of modifiers that affect its price.
This system should help you understand which factions value certain goods, where particular resources are commonly available, which factions refuse or dislike certain goods, where rare resources can be sold, and where exclusive resources can be found.
New Events
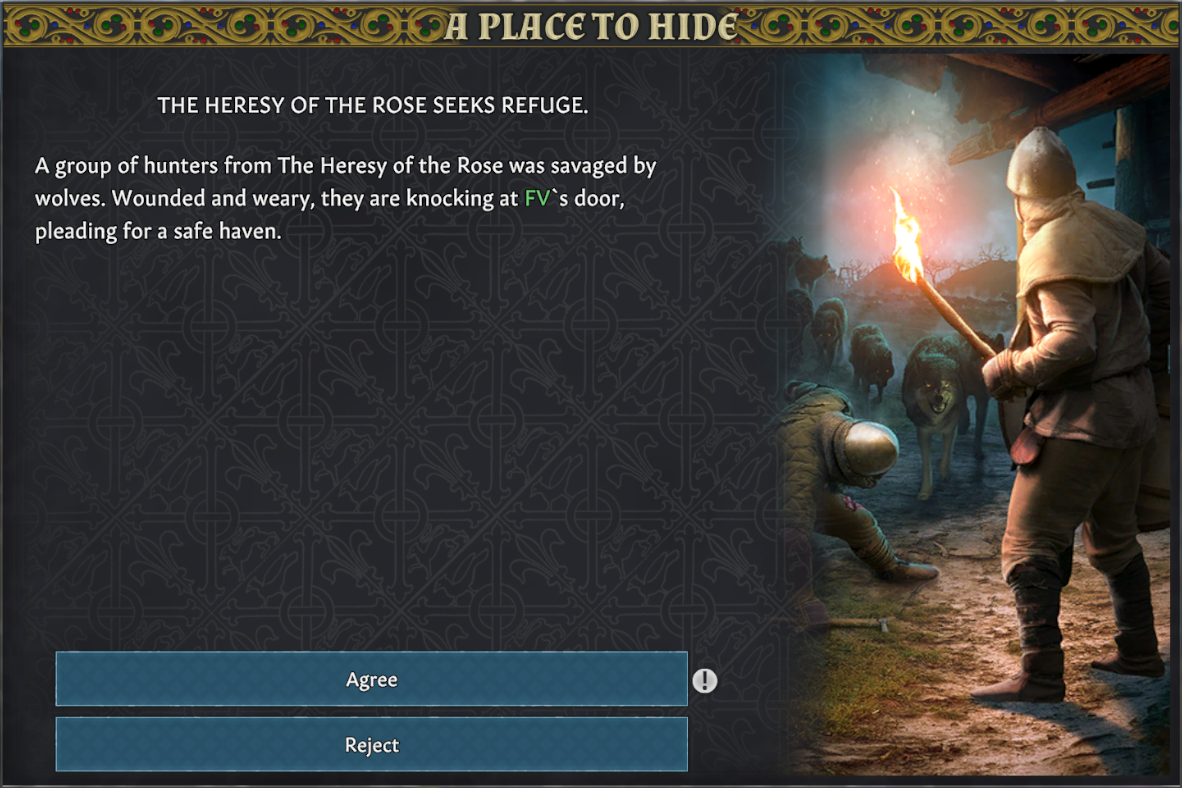
We’ve also added several new events that complement the systems introduced above:
- Faction Seeks Refuge for a Night – A faction group may seek refuge in your settlement for 24 hours or more. They will need a room where they can stay. If you accept them and honor the deal, you will gain some friendliness with that faction.
- Faction Seeks Help, Chased by Wolves – A faction group arrives at your doorstep asking for help. If you accept, the group will appear on the map, and two hours later, a group of wild animals will appear as well. Defeating the animals, or waiting for them to leave, will reward you with friendliness points. If any faction members are hurt or killed, the amount of friendliness gained will be reduced. Refusing to help may result in a small loss of friendliness.
- Non-Partisan Hirelings – From time to time, hirelings may appear in your settlement. You can ask them to stay and use them as a workforce for a limited period.
- Friendly Faction Brings Gifts – Friendly factions may visit your settlement as an NPC caravan and drop off gifts.
- Ambush Point of Interest – Beggars may reveal information about trade routes, allowing you to send a caravan and ambush a faction caravan. You will get details about where the caravan will be, what it may be carrying, and how protected it might be.
You know. Just a bit of friendly regional politics.
Quality of Life improvements
- Hauling Optimized – Before this optimization, Settlers would have to go through each storage on the map to find a suitable place for a pile. This would cause Settlers to just stand around while the calculation is happening, especially on very large maps and saves. Now the calculation happens much faster, as it knows which storages are viable, since they are cached in advance.
Added a prompt that lets you know which active mod causes settlers to refuse to sleep, so you can turn them off, and report the problem to the mod creators. Here are the brass tacks for the modders that need to update their mods:
- ScheduleModelRepository.json has been changed internally, and “SleepGoal” no longer exists, and is in turn replaced by: “SleepGoalWorker” (used by Settlers, Prisoners and Captive Labourers), “SleepGoalNpc” (Used by NPCs), and “SleepGoalAnimal” (Used by Animals).
- These goals function exactly the same as “SleepGoal” before it, but we needed to separate them due to some changes behind the scenes.
- Mods that completely replace ScheduleModelRepository.json, or entries in it, now cause Settlers not to sleep anymore, because these crucial values are missing.
- You can now trade weapons with neutral factions, too.
- Guest Bed – You can now mark beds for guest beds. Doing this will allow NPC chaplains, druids, merchants and their bodyguards, etc to sleep there. Basically, any folks that are not on the list on the left side of the screen. Hirelings, mercenaries and refugees will sleep in non-guest beds.
- Pest control pets will now continue hunting vermin inside the home area until there are no more. So when a rat infestation happens, you cats will not just lie around and do nothing
- Aggressive wildlife will now, after some time, choose a point within your home area as an idling point. Making them a bit more of a threat. Of course, if you are walled off, they will not bother you.
Bugs and Fixes
- Fixed several crash occurrences. Special thanks to Discord member derelict that helped us with a particular edge case.
- Fixed the issue that made Settlers position themselves under rally points instead of on them, in some cases.
And that would be all for this update. Development on Going Medieval doesn’t stop here, so keep your eyes on upcoming blogs.
Please leave us a review as that helps with the visibility, share your impressions and creations across all social media, join our wonderful community on Discord and don’t forget to…
Stay medieval!