

This Modding Policy should be read alongside the Mythwright Terms of Use and Valve’s Steam Subscriber Agreement. Learn how to create and use mods for Going Medieval, check editable files, and read our modding guidelines. If you plan to publish anything in Going Medieval Workshop, please read this first.
Dos & Don’ts
We want to ensure mods amplify the Going Medieval players’ experience in a positive way and that their authors don’t cross the line where we or Steam admins need to step in and remove their work.
Dos:
- To make everyone’s lives easier, please add a description, main image, and some screenshots that explain what your mod is about.
Don’ts:
- Don’t create mods that violate the Steam Subscriber Agreement.
- Don’t use other players’ work or copyrighted material, such as assets from other games, without explicit permission. If you were granted permission, credit the source in a respectable way and include proof of permission in the mod and its description.
- Don’t include any code with unexpected and/or malicious purposes. The community needs to be able to easily tell that your mod is not harmful in any way.
- Don’t make mods public if they’re meant for personal use or you know they’re unfinished and bound to break the game for other players.
- If you wish to pick up work on a mod that appears to be abandoned by the original creator, get in touch with them first to ask for their permission. Reuploads without a clear explanation of whether you have obtained permission for a reupload will be deleted.
- Don’t make mods available only behind a paywall or paid for in any other way – for example available only to your supporters on an external platform.
When publishing your new content, whatever it is, be respectful of others. Most importantly, we don’t want any form of hate speech – racism, homophobia etc. – in Going Medieval Workshop. - Content that may be generally construed as provocative, divisive, objectionable, discriminatory, or abusive toward any real-world individual or group, may be subject to moderation.
- Files that deliberately exclude character skin tones, where the intention could be deemed to be divisive, to cause hostility within the community or to marginalize specific group(s) – may be subject to moderation.
This page serves as a guide for the new modding support being added to the game. We will update this page as we continue to expand support for modding different parts of the game.
The best place to discuss Going Medieval modding is in the #modding channel on our Discord server.
Note: You must accept the EULA first to access mods and modding options in the game. Click on the “Mods” option on the Home Screen and then select “Accept”.
Note 2: Once you have mod working locally, you can put it on Workshop and update later on.
General
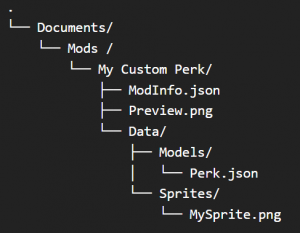
Mods are placed in the directory:
Documents\Foxy Voxel\Going Medieval\Mods\
Each mod must have its own subfolder, containing the following files:
- ModInfo.json
- Preview.png
And a Data subfolder that should contain additional information and the actual mod files.
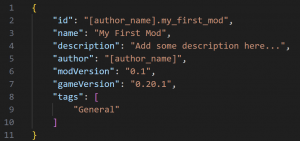
ModInfo.json
In the ModInfo.json, replace [author_name] with the actual Steam (or other) handle of the mod author.
Preview.png
The preview image will appear in the Steam Workshop as well as in the in-game Mod Browser. Allowed dimensions are 640×360 or 1280×720. The image size be must under 1MB.
[Data]
The Data directory should contain only subdirectories for currently supported mod types. You can read more about specific mods below.
Mod Types
General
Mods will appear in the Mod Browser on the home screen and can be enabled or disabled before starting the game. We will later add more functionalities, such as ordering and dependencies.
Localization
Mods will appear only in the Languages panel on the Home screen.
Scenario
Mods will appear only on the Starting Conditions screen, where the player can choose one as a starting condition.
Tags
Tags help players (and the game) filter content on the Workshop (and Mod.io later). Tags are flags, and one mod can have multiple tags. However, there are rules to follow. Tags that represent Mod Types (as listed above) should be used exclusively without mixing, as they determine where the mod will appear in the game.
Modding Localization
Creating a New Localization Mod Template
- Open the Language panel from the main menu on the Home Screen.
- Click on “Create New” and then select “Yes” on the popup.
- The new template will be located at:
Documents\Foxy Voxel\Going Medieval\Mods\English Localization
Editing
Tip: Keep a copy of the original file to compare formatting after editing.
You can now edit the Data\Localization\English.csv file in a text editor or import it into Excel or Google Sheets. This file contains all keys and English localization currently in the game.
Strings surrounded by ‘<‘ and ‘>’ are parsed by the game at runtime and must not be changed (or translated).
Strings surrounded by ‘[‘ and ‘]’ are used for grammatical gender parsing. These can be utilized where applicable, not just in English.
Rename the .csv file to the correct name of your language and replace the existing one. Don’t forget to edit Preview.png and Manifest.json as described above, and rename the directory to something like:
Documents\Foxy Voxel\Going Medieval\Mods\[my_language] Localization
Ensure that the Manifest.json tag is set to “Localization,” without including other Mod Type tags listed above.
Testing
- Open the Language panel from the main menu on the Home Screen.
- Your mod should appear here. Select it, and the game language should change immediately. You can start testing now.
Sharing/Updating (Workshop)
- Open the Language panel from the main menu on the Home Screen.
- Click on the “Upload/Update” button.
- The Workshop overlay will pop up. It may take a few minutes for the mod to be updated and displayed properly on Steam.
Updating Existing Localization Mods
In the future, when preparing a new update, we will share new text keys with our modding community on Discord as soon as they are ready. You will receive preview access to the new build, allowing you to export the .csv file again, merge it with existing translations, and translate any new entries.
Update the mod version and use the new game version generated in the new Manifest.json. Test the mod and update it on the Workshop.
Modding .json Files
Going Medieval stores its data in uncompiled JSON files located in the Streaming Assets directory. Modifying these files is relatively simple but we recommend creating a new mod and editing your copy of the JSON file. Most JSON files include an initial dummy entry containing comments that explain each field, its purpose, and its meaning.
The majority of JSON files use a â€repository†array, which holds models. Modded JSON files can include both existing and new models. This is determined by comparing the â€id†fields in the modded file with those in the vanilla JSON files.
When the game loads, it processes all JSON files with the same name and creates a repository according to specific rules:
If a model ID does not exist in the vanilla files:
- The new model will be added to the repository. In this case, the model must be complete and include all required fields and values.
If a model ID already exists in the vanilla files:
- Fields with the same name will override the existing values.
- Omitted fields will keep their original values.
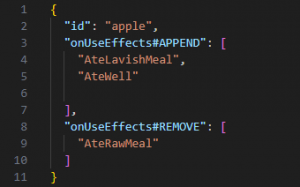
- List fields will also override the existing ones, unless:
- The name contains #APPEND: The new list items will be added to the existing list.
- The name contains #REMOVE: The specified list items will be removed from the existing list.
Creating a Mod Template
- From the Mods Manager on Home Screen click on Create. This will create an empty mod template at the Documents\Foxy Voxel\Going Medieval\Mods\
- Rename “My Default Mod Template” to something else, “My Perk” for example.
- Edit ModInfo.json and Preview.png as described above.
Adding modded json
- Navigate to Data\Models\ and create Perks.json file.
- Open original Perks.json located in Streaming Assets and copy Perk(s) you want to edit
- Paste it to your file and make adjustments. Note: Change id if you want to create new item, Keeping same id will override existing (vanilla) one.
Adding modded Sprite (icon)
- You can now add a custom sprite for your Perk. Navigate to Data\Sprites\ and paste 64×64 png file.
- Make sure file name matches “iconPath” field value in Perks.json you just created.
Testing mod
- Now run the game and open Mods Manager from Home Scene.
- Your new mod should appear on the list. If you select it you should be able to see the details.
- Thick checkbox to enable it. Otherwise it won’t be showing in game.
- Start new game and click next until you reach Character Creation screen
- Enable Advanced Customization at the bottom of the page.
- Under Perks click on + and find your perk. Add it to the Settler.
- See how the settler behaves in game and if effects of the perk are applied.
Supported json files
Almanac\
– Almanac.json
– AlmanacEntries.json
– Links.jsonAnimal\
– AnimalAttackGroupRepository.json
– AnimalBase.json
– AnimalName.jsonCombat\
– CombatAiAgents.json
– DamageTakingAgentSettings.jsonConstructables\
– BaseBuildingRepository.json
– BeamComponentRepository.json
– BedComponentsRepository.json
– CaravanPostComponentRepository.json
– ChairComponentRepository.json
– ConstructableQualitySettings.json
– DecorationComponentRepository.json
– DoorComponentRepository.json
– EntertainmentComponentRepository.json
– FuelConsumerComponentRepository.json
– GallowsComponentRepository.json
– GateComponentRepository.json
– GraveComponentsRepository.json
– LadderComponentRepository.json
– MapTableComponentRepository.json
– PenMarkerComponentRepository.json
– ProductionComponentsRepository.json
– RoofComponentsRepository.json
– RugComponentRepository.json
– ShelfComponentRepository.json
– ShrineComponentRepository.json
– SignComponentRepository.json
– SlopeBuildingComponentRepository.json
– StabilitySettings.json
– StairsComponentRepository.json
– TableComponentRepository.json
– ThermalModels.json
– TradingPostComponentRepository.json
– TrapComponentsRepository.json
– UniversalStorage.json
– VoxelBuildingComponentRepository.json
– WindowComponentRepository.jsonCreature\
– DietModelRepository.json
– PathfindingPenaltyRepository.json
– ScheduleConfigRepository.json
– ScheduleModelRepository.json
– WalkableModelRepository.json
– WalkSpeedMultiplierRepository.jsonCropfields\
– Cropfields.jsonData\
– DaysFromStartMultipliers.json
– DifficultyOptions.json
– GameDifficulty.json
– ObjectActionData.json
– PlantShapeRepository.json
– ReligionConfig.json
– RoomTypes.json
– StartingEventSchedule.json
– VillageName.json
– WeatherEvents.jsonFaction\
– FactionRepository.json
– FactionTypeRepository.jsonGameEventSystem\
– EventGroups.json
– GameEventSettingsRepository.jsonGOAP\
– JobPriority.json
– Job.jsonHuman\
– HumanAppearance.json
– HumanType.jsonItems\
– ArmorQualitySettings.json
– Equipment.json
– GarmentQualitySettings.json
– MaterialSettings.json
– WeaponQualitySettings.json
– WeaponTypeSettings.jsonNPC\
– NPCPresets.json
– NPCs.jsonPlayerTriggeredEventSystem\
– PlayerTriggeredEvent.jsonMap\
– MapPropTypes.json
– MapSizes.json
– MapTypes.json
– Slopes.json
– VoxelTypes.jsonResearch\
– Research.jsonResources\
– AnimalProductionRepository.json
– DecayModifiers.json
– DigMarkers.json
– FishMapResource.json
– ManageGroup.json
– ManageGroupPreset.json
– PlantMapResource.json
– Production.json
– ProductQualityChance.json
– Resources.jsonRoles\
– Role.jsonScenario\
– Scenarios.jsonSettings\
– AltCameraSettings.json
– BaseWealthEffectors.json
– BuildingWealthMultipliers.json
– CameraSettings.json
– CropBlightSpotsByRaidPoints.json
– DateTimeSettings.json
– DaysFromVillagerKilledMultipliers.json
– FactionGameModeSettings.json
– FactionRelations.json
– FireSettings.json
– GridDataTypeAttackTraversePenalty.json
– MerchantLimitPrisonersByPrisonerCount.json
– MerchantLimitPrisonersByWorkerCount.json
– PilesWealthMultipliers.json
– RaidMaxPrisonersBySettlersAlive.json
– RaidSurrenderChanceByPrisonersCount.json
– RaidSurrenderChanceBySettlersAlive.json
– ResourceSettings.json
– RoomImpBeautyMultipliers.json
– RoomImpressivenessSettings.json
– RoomImpSpaceMultipliers.json
– RoomImpWealthMultipliers.json
– SnowMeltSpeed.json
– TemperatureSettings.json
– TradingSettings.json
– WardenRoleSettings.json
– WorkerCountMultipliers.json
– WorldMapRaidInfluenceMultipliers.json
– WorldMapSettings.json
– XpDecaySettings.json
– ReleasePrisonersFriendlinessBuffByMood.jsonSocialInteraction\
– CombatLogData.json
– ConversationLogData.json
– ConversationTopic.json
– EventInteractionData.json
– HealthLogData.json
– LifeEventLog.json
– SocialCompatibilitySettings.jsonStatsSystem\
– Attributes.json
– AttributesLists.json
– DecayIconSettings.json
– Effectors.json
– HitEffectorGroups.json
– StatsModelRepository.json
– Wounds.jsonStockpile\
– ResourceGroups.json
– Stockpile.jsonTrading\
– TraderStockModifiers.json
– TraderStocks.json
– TraderType.jsonWarMachinery\
– TrebuchetBase.jsonWorker\
– Background.json
– BackStory.json
– GenerationRules.json
– GoalPreference.json
– GoalPreferenceLevelData.json
– Name.json
– Perk.json
– Pseudonym.json
– SkillLevels.json
– SkillTag.json
– WorkerBase.json
– WorkerPreset.json
Creating and exporting assets
Unity Editor and project setup
- Download the Unity Editor version as specified here (make sure you install Unity Windows Build Support).
- Clone this project.
- Add project to Unity Hub and open it.
Making Your Asset Build
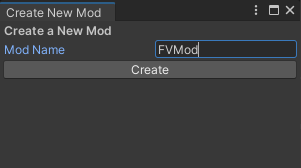
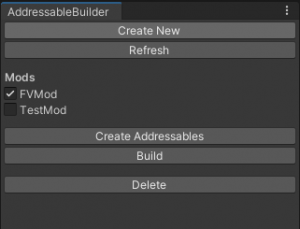
- After Unity loads, you should see the AddressableBuilder window. If not, you can open it manually from the “Going Medieval” menu at the top of the screen.
- Click the Create New button.
- In the following popup give your mod a name and click Create.
You should be able to see your mod in the Project Window, including empty folders. It’s advised that you don’t edit this directory manually.
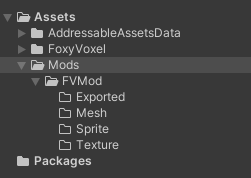
Now, you can copy assets to the correct folders.
- .fbx files to Mesh,
- Texture .png files to Texture,
- .png files used for UI to Sprite. For those, there’s an extra step. Set Texture Type to Sprite (2D and UI) and apply changes.
Going Medieval uses TMP Sprite Assets for displaying icons in line with text. Open the “Going Medieval>TMP SpriteAsset Creator“ window to create it. Select the Mod Root Folder – in our example that is “Assets/Mods/FVMod”, this selects all sprites from the Sprite folder. The window is now populated with a list, modify the selection if needed and click Create TMP SpriteAssets.
![]()
Back in the AddressableBuilder window, make sure your mod is selected and click on the Create Addressables button.
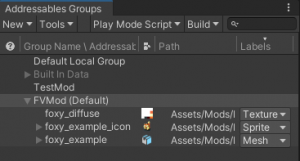
Open Addressable Groups window (Window>Asset Management>Addressables>Groups) and you should see your newly created mod group set as (Default) with all assets in it and with all labels correctly applied.
Once again, in the AddressableBuilder window, check if your mod is selected and click on the Build button.
After the build is done, asset packages should be placed in the mod’s Exported folder. Copy its contents to your mod’s “Documents/Foxy Voxel/Going Medieval/Mods/Data/AddressableAssets/”and use the new assets in JSON files to show assets in the game.
Mesh and Texture modding
General Mesh rules
- All meshes in the game use FBX format
- The grid space in the game is 1×1 unity unit or 1x1m. So in the 3d program of choice please use 1 unit = 1 meter
- The axis Y is up
Modding a pile
Modding regular pile
Regular piles or pies that use the base_resource_pile prefab are simply 1x1m meshes that will use the texture that is used in the MaterialParameters that is marked as albedo.
Note that all piles have CountVariations for meshes. That means that if you add more stack sizes the game will use the stack sizes according to the number of resources in the stack
Modding equipment (using material_map texture)
Equipment piles
Equipment piles are a bit different because they don’t have stack size but use QualityVariations so almost all equipment has quality01 as a mesh meaning that all quality tier uses the same mesh. If you wish to add more quality variations the QualityVariations use 6 entries and change each entry to a different mesh (see cap as an example).
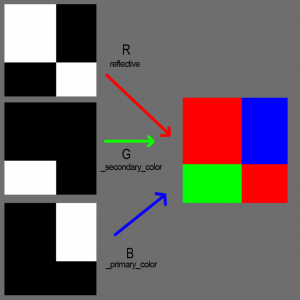
Equipment piles have 2x texture slots in their material. The first one is the albedo and the second one is the material_map. Notice that the albedo one is mostly white. That is because the equipment inherits color information from the MaterialSettings.json while in pile and equipped form.
- The material_map texture regulates what on the texture is reflective and what is overlaid by what color.
- If you wish to make a new texture and utilize the MaterialSettings visual properties you will need to draw a material_map that uses the following color rules:
- Red channel is what part of the equipment item will be reflective.
- Green channel is the secondary color (it is mostly a wooden part of a metal sword or a metal part of a wooden weapon).
- Blue channel is the primary color. So the part of the texture of the sword that needs to change with the changes in material will have that blue overlay.
- Note that all channels can mix. So, having yellow color means that it’s using green and red channel in the same pixels.
Equipped meshes
The meshes that appear equipped on the settler/enemy are the same meshes that are used for the mesh variation of the pile.
Like pile meshes the equipped meshes also have their transform changed (so that means the equipped mesh can have different orientations, scale and position than the pile mesh).
Other Pile types
Other pile types consist of:
- base_ingot piles – It uses a separate shader that shades the metal of the ingots. Can be easily used for new metal types reusing the same meshes of the ingot. Note that ingots don’t have textures but rather only colour information.
- Base_filth_piles – It uses an animated shader to animate the flies flying around. To get this effect on a new mesh the mesh needs to have vertex colors where green vertexes will show the fly effect while all other colors will show the texture.
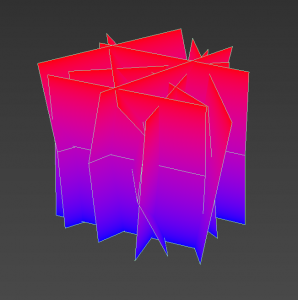
Modding structure
Structures in going Medieval use several different material types in order to have different ways of rendering textures and effects.
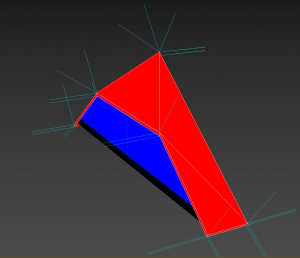
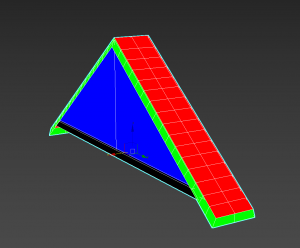
- Triplanar material rules (walls, merlons, furniture and production buildings)
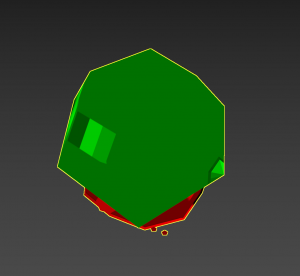
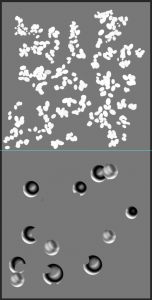
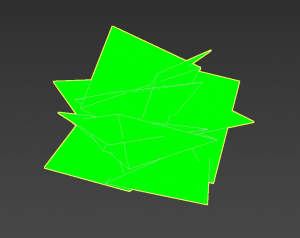
- This means that this structure uses a combination of regular texturing and tri-planar texturing that is tiled in world space. So a wall has details that use regular UV to form a texture (like the lower details) and uses a triplane texture like the tiled blocks. Some Production buildings like the smokehouse, Stove, and Smelting Station also use this type of material. As well as braziers and fire pits. In order for the mesh to use this it needs to be vertex colors like in the image. Note that if the mesh is not utilizing any vertex colors the material will not show the triplanar parts and will render the mesh with the base albedo.
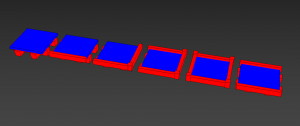
- Floor material rules
- Similar to the triplanar version, floors render in world UV and only on the top side.
- Basic material
- Most furniture and production buildings utilize the basic structure material. This material can utilize the albedo, reflection and emissive maps.
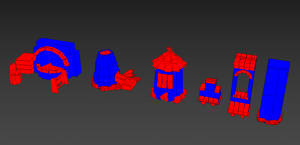
- Cloth structures (banner, merchants stall)
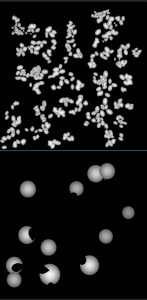
- Cloth structures like banners and merchant stalls have a special material that animates some parts to simulate the effect of wind. In order for the mesh to property behave the vertexes of the mesh needs to be colored like in the image bellow:
- Blue – has the vertex offset effect of the cloth moving
- Red – still is cloth but is more firm and does not move that much. Notice how the merchant stall has red in places where the cloth is being held by the wooden beams
- Green – it determines where the regular base texture will be shown. If green is not used, the mesh will have the texture of the settlement’s heraldry (notice how royal beds have drapes that use the cloth effect but utilize green in every vertex so as to not have the heraldry show).
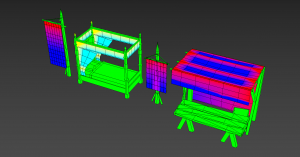
- Roof structures
- Roof structures similar to walls use a combination of triplanar texturing and also have a special texturing system for the slated parts of the roof that use Normals in order to know where the roof tiles need to be oriented.
- The roof meshes have detached normals that point out at a 90-degree angle from the roof surface.
- The roof shader also utilizes vertex colors for various textures and material properties:
- Red – roof texture
- Blue – wall texture
- Black (no colour) is used for the beam colours
- Green – Only used in hay roofs for the edge details that need texturing but don’t follow the rules of the normals as the roof tile texture does.
- Also, note that the hay roof has more polygons because it utilizes a vertex displace effect so it looks bumpy. 🙂
Modding Flora
Flora’s growth in Going Medieval is driven through the phase system all plants have where in each phase we determine what will be changed in the visuals of the plane. Usually the plant scales, but some materials parameters are also changed. Almost all of the plants in Going Medieval “grow” via material effects (leaves appearing, getting larger, etc.).
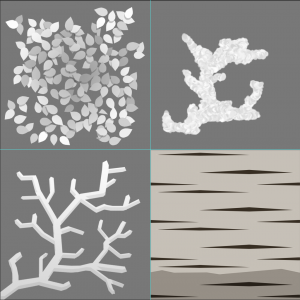
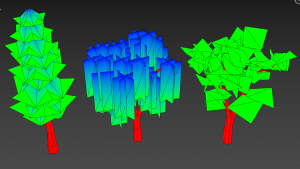
Modding trees (leaf, hanging, pine, trees with flowers)
Trees have 3x different categories (leaf, hanging, and pine). Almost all of them have similar ways of using growth via the material parameters and utilize the alpha channel in textures for that.
Texture: As you can see the birch texture is almost all white and the color of the leaves are driven from material parameters in the json. If you wish to mod the texture of a plant and reuse the mesh please follow these guides. Split the texture in 4x parts:
- Branches: lower left
- Leaves: upper left
- Trunk : lower right
- Snow: upper right
The Alpha channel is used to simulate the leaves and snow getting larger.
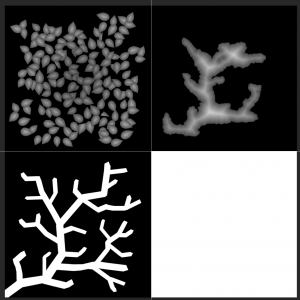
Note that the leaves go from white to dark grey meaning that the white parts will appear first in spring. Also, Snow appears from white to dark gray.
You can add fruit and flowers to any tree by adding an additional FlowersFruit texture.
In the texture, the lower part is the fruit part. The black and white color is used to mix the colors in the MaterialParameters (see apple tree in plantMapResources.json).
The upper part of the texture is the flowers part. The shape and the density of the flowers is in this texture while the color is also defined in the MaterialParameters of the tree.
As with the base texture, the FlowersFruit texture uses the alpha texture for fruit growing and flowers blooming:
Mesh: Trees utilize vertex coloring so we can determine what is the trunk, what are leaves and what is affected by the wind the most.
- Red – Trunk and branches. They already bend via shader effects from the base to the tip.
- Green – The green part is affected by the wind the most.
- Blue – Canopy areas that are not affected by wind that much. Notice the blue parts of the pine and willow tree.
Modding shrubs
We have 2x variations of shrubs – Regular shrub (ivy and basic) and Berry shrub (used only for redcurrant).
Texture: setup in a similar way to how its setup wit trees – split into 4x parts.
- Ivy shrub texture. Has no upper right part because has no fruits to yield.
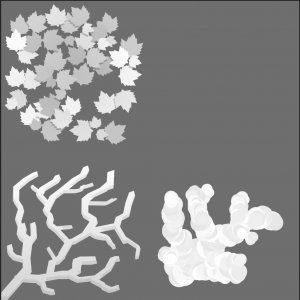
- The Redcurrant shrub has its fruits in the upper right corner.
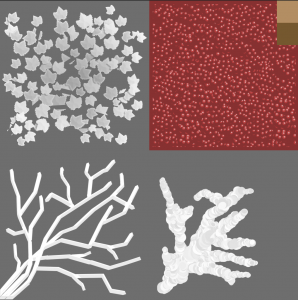
- The alpha channel of the redcurrant shrub determines the growth of the berries (darker berries will ripen in later phases).

Mesh: uses the same ruleset for colors as trees.
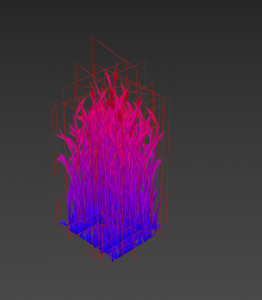
Modding grass plants
Grass plants have only one variety and are used by tall grass, reeds and barely.
Texture: Setting it is very simple and the material parameters in the json can determine what color will it use when young and old.
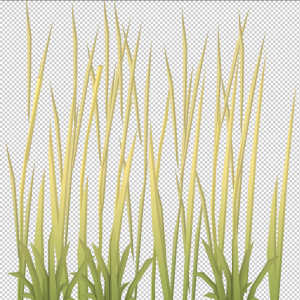
Mesh: Uses red and blue vertex color only to determine where the wind has the most influence.
Modding Flower plants
Similar to tall grass, this type of plants is used for flax and herbs.
Texture: Set up in in 4 parts like trees and bushes. The dry parts are in the right lower part, the base is in the left lower part and the flowers are in the upper part. Note that flowers can be added to the dry half if needed.
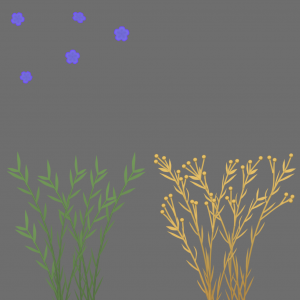
Mesh: Uses red and blue vertex color only to determine where the wind has the most influence.
Useful Links
Going Medieval Discord – The quickest and the most direct way to talk to fellow modders.
Going Medieval Steam Workshop – Try other mods & request some.
Going Medieval Reddit – Reddit loves their mods, too.
Alternatively, you can send us a mail via contact page – It might take some time for us to respond to you, but we’ll get to it eventually.